
Hi there. I have not blogged in a long time but I am begging for forgiveness. I am trying to wrap my head around a new classroom structure known as staggered day. This might not seem like a big deal but for 25+ years I have worked with a partner. So now I am totally on my own and have to rethink how to set up for this. It took me a long time to figure out a functional room environment down to where to put my tables and how to set up my centers. I struggled and kept changing it up until some of my friends came in and tossed half my furniture out the door and reconfigured my room. Thank goodness they took pity on me! Without another adult in the room I had to change up my lesson plans and plan activities in a very different manner. Centers could not be monitored by another adult and we are not given aides. With that being said I had to fly solo and figure it out.
I realized that my centers would really need to be super simple or they would crash and burn which would be a total disaster. I also saw from my roster that I had a roomful of boys that needed to be more physically active before I hit them with the real work of kindergarten. So I want to share some of the ideas I came up with and you can see what you think...
First I realized that I needed to store these ideas in a notebook with photographs and any files necessary to make these again if they got loved "to death." So I made several notebooks which are filled with Getting Started Activities that do not involve much academic background. My students are ELL's with limited preschool experience. I wanted them to love school and sneak in some of those crucial skills to make them successful in school.

Most of those adorable little boys have not held a pencil or scissor and this becomes a struggle right from the start. Many of our students cannot write their name and need to strengthen their fine motor skills. I don't want them to get discouraged and this is an easy activity to help build their muscles without being too painful. The tweezers are from the Dollar Tree but you can change this up with tongs which are a bit easier. If they are not ready for counting then just let them put the pompoms in containers or sort by color. I used an old muffin tin (I will hate myself when I want to bake) and I glued bright papers inside. Finally I added the numbers for those that can handle this. Differentiate as needed. Easy to throw together right?

Lacing cards are another tool for building fine motor skills and most kids love doing these once they get the hang of it. Why did I make these? I made them much bigger and easier to manage. The cords can be purchased in any craft store. We talked about school supplies before I modeled how to do this and put kids with a capable partner to keep things moving. All you need is clip art, cardstock, and lamination to make this happen. It took no time to throw together. Grab a hole puncher and just make holes around the image. No sweat!

Playdoh is always a huge favorite in my room but I found kids getting a bit restless after a few days of using rolling pins and making snakes. They were not ready for letters yet but I was doing guiding drawing with them and they were loving it. That gave me the idea of making mats where they could add details to the picture. They loved this and I am working on a packet that might become available. It was so much fun to watch them as they thought about how to make each mat more interesting and their creativity was amazing! This was super easy to slam together and can be used throughout the year. I can connect them to each theme too!

Some of my students knew some of the letters of the alphabet and were ready for a more challenging center but not something that required too much interaction from me. We all love all the font sorting cut and paste activities that we can grab. I even have one in my store. However, I love that this is more interactive and I have a colored sticker on the back of each letter so they become self checking. My students love playing this with a partner and taking turns turning over a card and placing it on the right mat. Students can be partnered strategically so they do not struggle with this. This center is easy to make and can be used for many months, as you introduce the letters. This is simple and not too complicated to put together. I store all the pieces in small ziplock baggies.

Here is a peek at a few of my kinders playing this. What do you think?

This is one of my favorite centers and I did a lot of kid watching when I had students doing this activity. Students had to decide what 2 pictures went together. Some students did this with ease but others did not have the vocabulary to support this and had a more difficult time. My ELL's obviously found this more challenging. I made this center self checking too by putting matching stickers on the back of each set that formed an apple. Easy peasey... Students made some combinations I might not have thought of and this made for interesting conversations.

I knew I HAD to create centers that would be fun for the boys so I made these alphabet roads that kept them busy with the matchbox cars I provided. They loved finding the first letter in their name or their friend's. Boys and cars go together like peanut butter and jelly so I kept brainstorming ideas that would float their boat as the saying goes...

More centers on the same order: I added racing flags and monster trucks to these numbers and I found that running them just on colored paper saved me ink and they were just as happy doing this. Many of them knew their numbers and this was an easy way for me observe that without stressing out using an assessment. I made several sets of these to keep the whole gang happy. I laminated some sets and put others in page protectors. Easy, right?

Okay this was my best center, ever. I took jumbo sticks (Walmart) and painted them black. Then I made white dotted lines using a paint marker. I made zillions of these and the poor hubby was non too thrilled that dinner was not even on my radar that night. Then I decided to make signs and buildings so the roads would be more interesting. How could I make these stand up? No problem, I used binder clips. I taped the signs to smaller sticks and even used a photograph of the front of the school. Obviously I just added a bunch of little cars and they let their imaginations run wild. This was a hit! Score.

The more academic kids enjoyed putting these simple fishy puzzles together and helped each other put them in alphabetical order too! It was a challenge that they enjoyed if they had the background knowledge to be successful. This could be done as a guided activity in your guided reading groups too. The template is simple and took very little time to put together.

Tracing is another worthwhile activity for those littles that still need to strengthen those hands in a non threatening way. All you need is an expo marker (pull out those fancy colored ones) and a small eraser. This takes little prep and was another center the kids really liked. I punched a hole in the upper left hand corner and used a ring to keep them together.

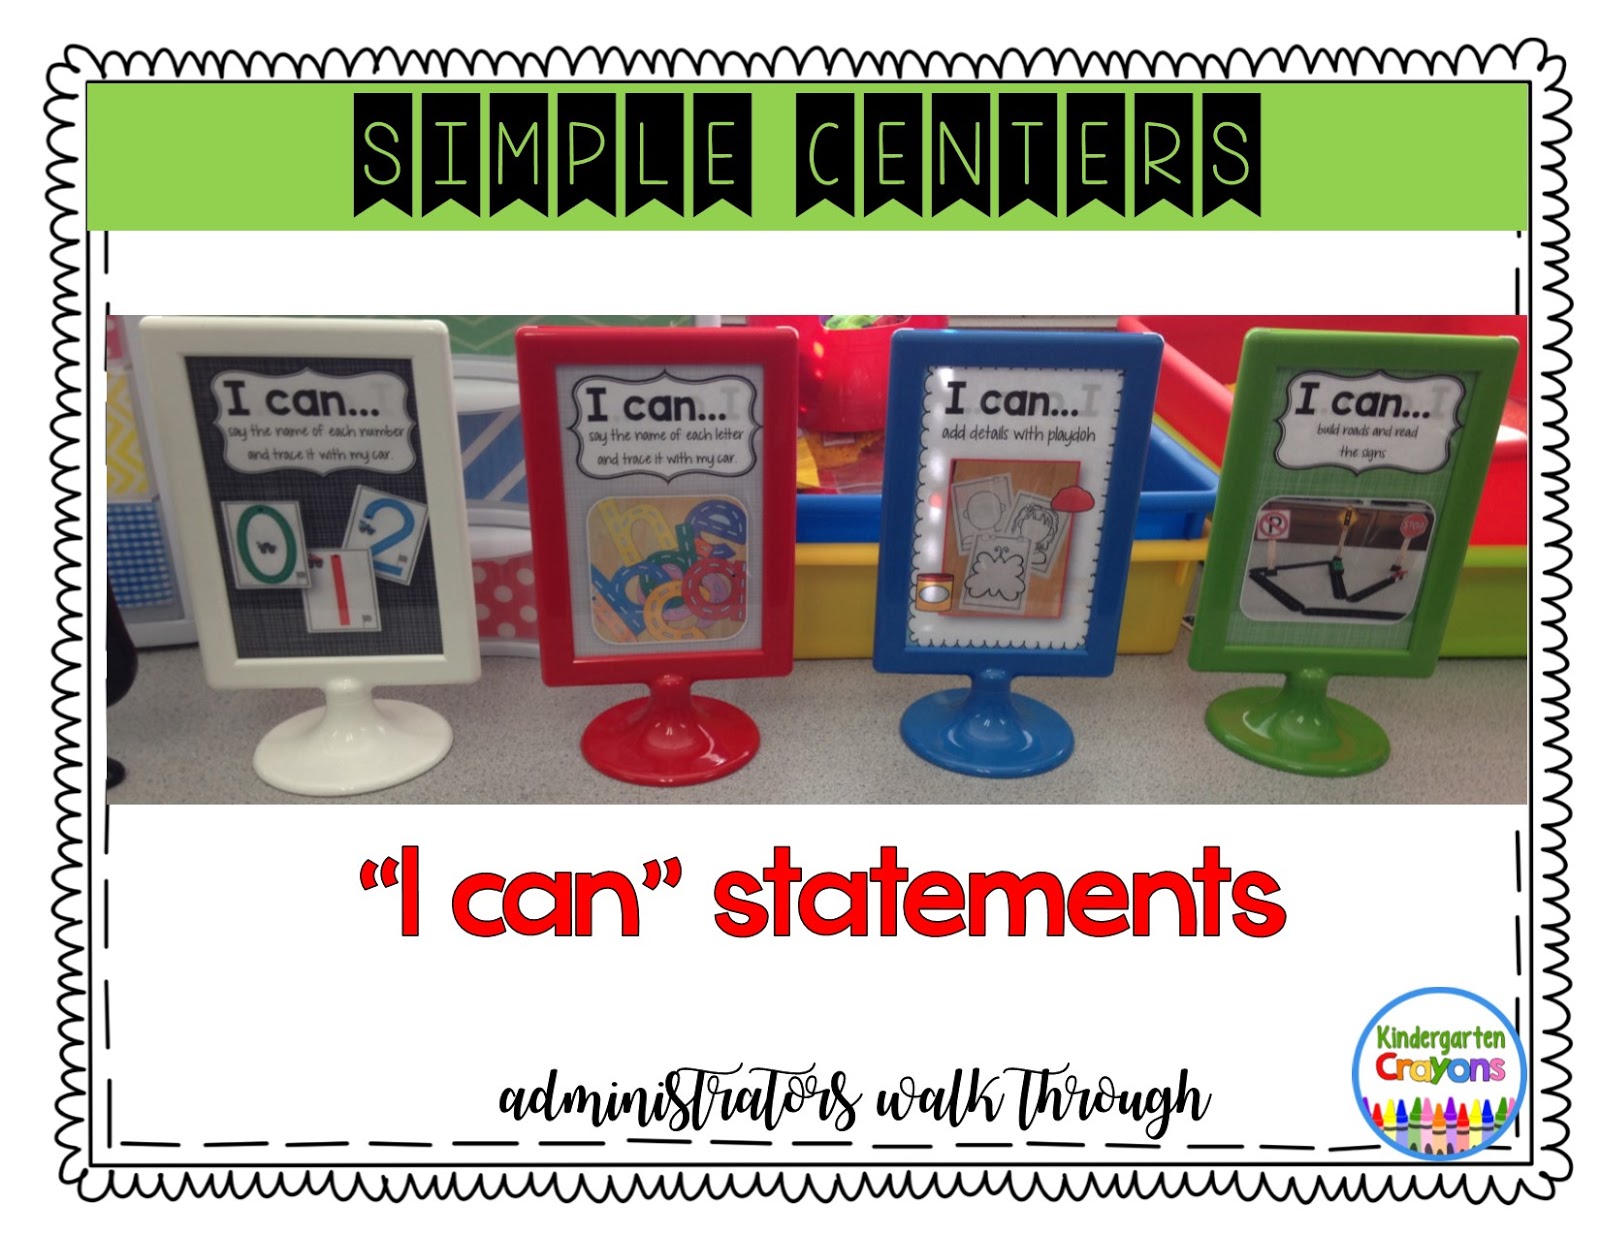
Finally, I used those dollar frames from Ikea to post the "I Can" statements that go with each learning station. Now my administrator will have a clear understanding of the purpose for each of these activities. Many of them also require creativity, problem solving and learning to work with a friend.
I model each center before releasing the students to use these and at the beginning I kid watch as they use these. This helps me trouble shoot any problems that might occur. I hope this is helpful when you design your first set of centers. I hope your year is going well as we face the challenges of CCSS and limited resources for implementing programs.